Finding elements in Web Applications
Introduction
Our engine is using Selenium to locate the elements in Web Applications.
The different locators are as follows:
- Id
- Text Inside
- Name
- Class Name
- XPath
- CSS Selector
- Link Text
- Partial Link Text
Even if you are using our Endtest Chrome Extension to locate your elements, you might still encounter situations where you need to fetch a locator.
But what can you do if you're getting an error message?
Common errors and solutions
1. Element not found
This error tells you that no element could be found with the locator that you provided in the moment when your test reached that step.
It could mean that the locator that you provided is not good, which means that you need to try a different locator.
If the locator is correct, it could mean that the element took a bit longer to load.
Our engine automatically waits for an element to be present before attempting to interact with it.
And the maximum wait times (timeouts) can be configured.
This means that the solution in this case is to increase the values of the Element Load Timeout and Page Load Timeout options from the Advanced section of the Settings for that test suite.
Even if the waits are automatic, you can still add a Wait Until step to wait until a certain condition is true.
The Wait Until option can be found in the Miscellaneous action.
More details are available in the Waits chapter.
It's easier to debug the error if you have a screenshot taken at that exact moment.
That can be easily achieved by selecting the On every error or On every step option from the Automatic Screenshots dropdown from the Advanced section of the Settings for that test suite.
2. Element not clickable
Our engine automatically waits for an element to be present before attempting to interact with it.
Details about that are provided in the Waits chapter.
But there are scenarios where an element might be present, but not necessarily clickable.
In such scenarios, you need to add a Wait Until step and use the Element is clickable condition.
There is also the possibility that the element is not clickable because it is covered by another element.
3. The element is covered by another element
In order to mimic a real user, our engine cannot perform a Click action on an element if it is covered by another element.
If you are getting this error message, it means that your element has been located, but a different element is covering it.
The error message will tell you which element is covering your target element.
This error can have multiple causes, such as a popup covering your element or a static header or footer in front of your element.
The solution in this case is to perform the same action that a real user would do in order to reach that element.
If you can scroll the element into view, add a Scroll step.
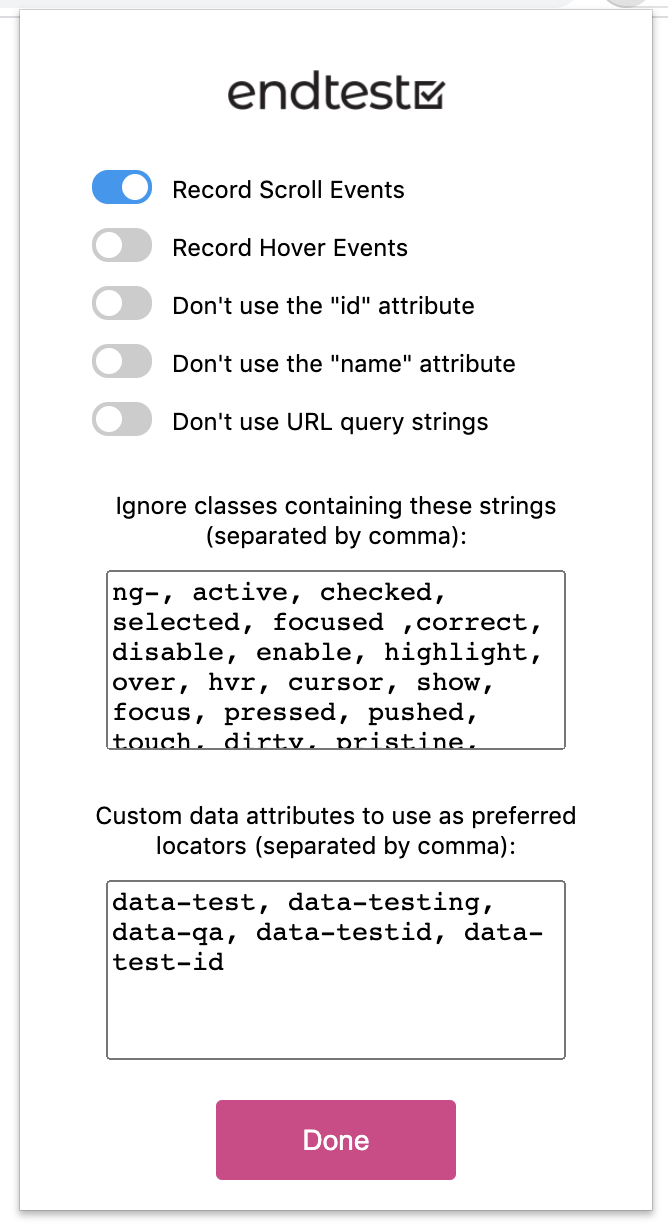
You can also enable the Record Scroll Events option in the Settings of the Endtest Chrome Extension
If you can remove the element which is covering your target element, do it with a Click step or an Execute JavaScript step.
4. Could not write text in the web element
In order to mimic a real user, our engine cannot perform a Write Text action on an element if it's not an input or a textarea.
If you are getting this error message, it means that your element has been located, but it also means that you're targeting the wrong element.
Make sure that your locator points to an input or a textarea.
Tips and Tricks:
1. Make sure you read the error message.
The error messages will point you in the right direction or at least tell you exactly what went wrong.
2. Configure the Settings for the Endtest Chrome Extension.
If your elements have dynamic IDs, you can enable the Don't use the "id" attribute option.
If your elements have custom data attributes, you can take advantage of that and add the names of those attributes in the Custom data attributes textarea from the Settings section of the Endtest Chrome Extension
3. Configure the Settings for your test suite
If you are executing the test on an environment which is a bit slower, you should increase the values of the Element Load Timeout and Page Load Timeout options from the Advanced section of the Settings for that test suite.
It's easier to debug the error if you have a screenshot taken at that exact moment.
That can be easily achieved by selecting the On every error or On every step option from the Automatic Screenshots dropdown from the Advanced section of the Settings for that test suite.
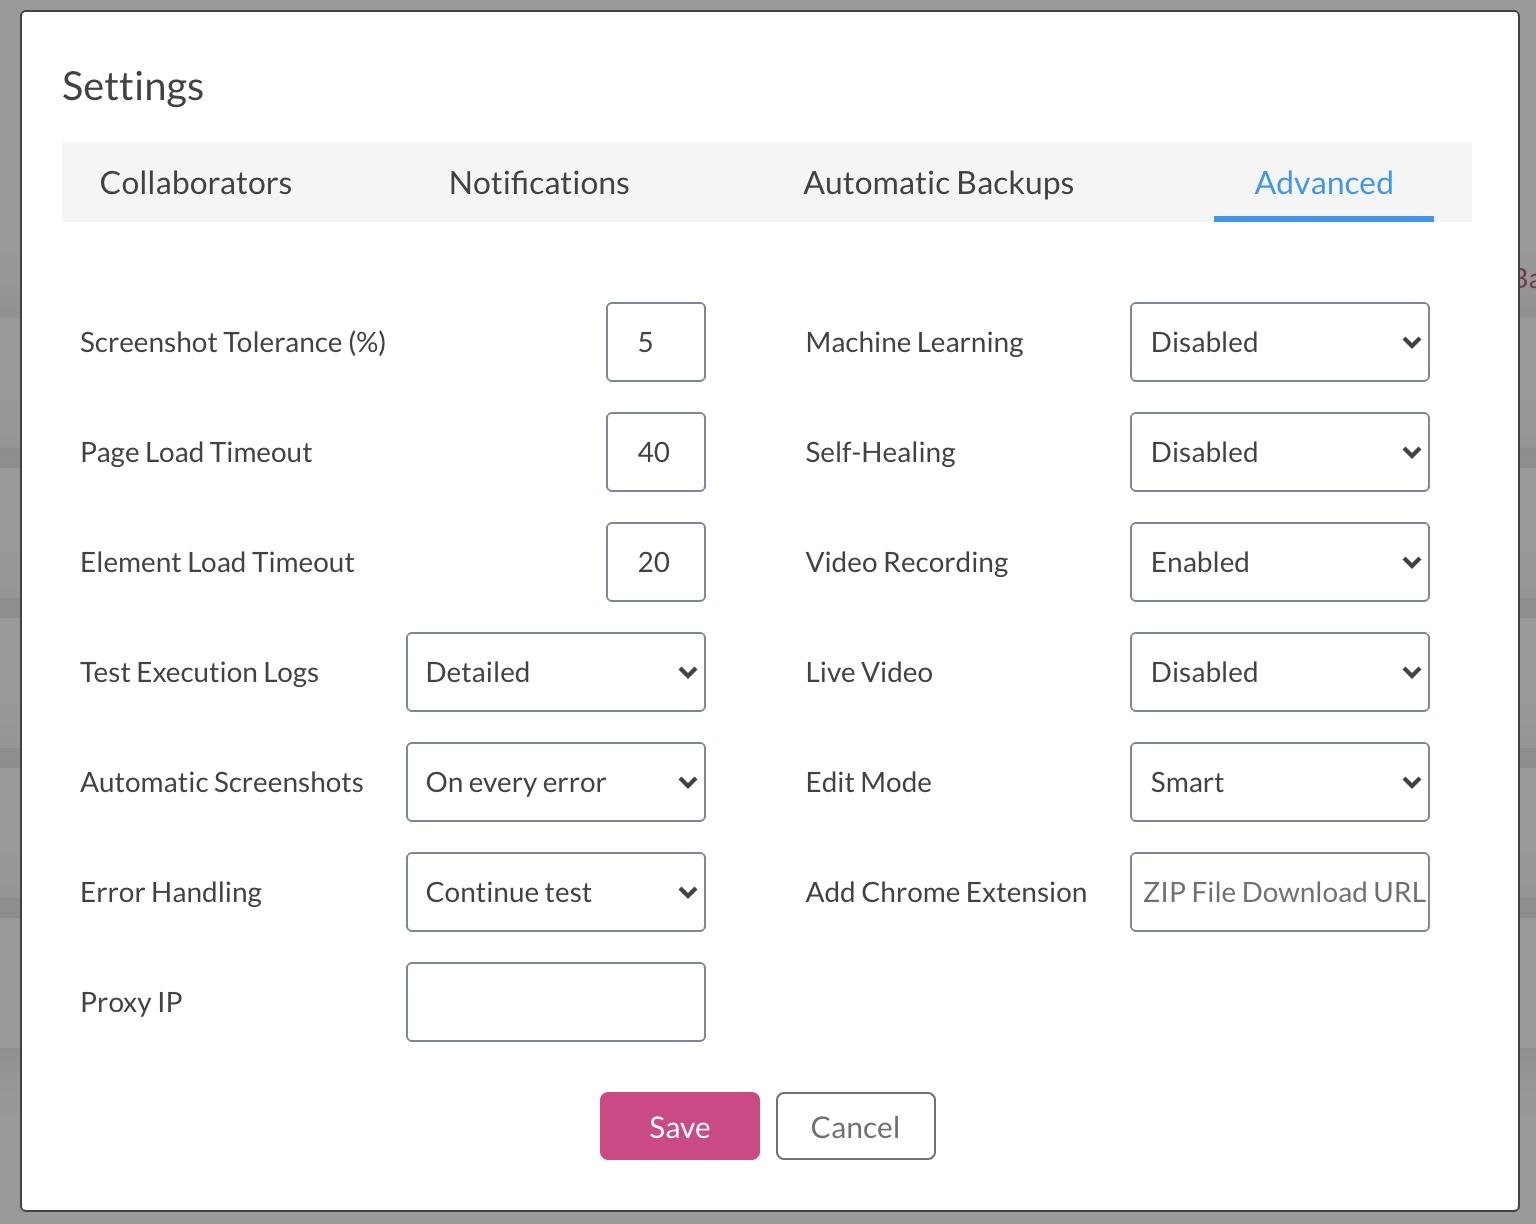
More details are available in the Advanced Settings chapter.
4. Make sure that your locator is unique.
If our engine finds more than one element with that locator, it will just go with the first one, which might not be the one you're interested in.
In that case, you will also see a [WARNING] in the test execution results.
5. Try to use a different locator type.
For example, if you were using Class Name, you can try with XPath or CSS Selector.
6. Is the element included in an iframe?
In that case, you need to add a Switch to iframe step before the step that interacts with that element.
After you're done interacting with that element, you can return to the main context by adding a Switch back to main action.
Both actions can be found in the Miscellaneous category.
More details are available in the How to test in iframes chapter.
7. Is the element covered by another element?
In order for our engine to interact with an element, it cannot be covered by another element.
The solution in this case is to perform the same action that a real user would do in order to reach that element.
If you can scroll the element into view, add a Scroll step.
If your element is covered by a popup, add a Click step to close that popup.
If that popup appears intermittently, that Click step should be added inside an If Statement.
You can also hide or eliminate the element that is covering your target element by using an Execute JavaScript action.
Or you can modify your step to click on the element which is covering your target element, if this leads to the outcome that you are looking for.
Another option is to perform the click on your target element with an Execute JavaScript action, which we do not recommend, since it does not mimic real user behaviour.
8. Is the element located in a different browser tab?
If your test clicks on an element and this opens a new tab, our Selenium engine will not switch the focus to this tab automatically.
You have to add a step for that by using the Switch to next tab and Switch to previous tab actions.
Both actions can be found in the Miscellaneous category.
More details are available in the How to test in multiple tabs chapter.
9. Is the element located in a Shadow DOM?
You can easily switch by using the Switch to Shadow DOM and Switch to Main DOM actions.
Both actions can be found in the Miscellaneous category.
It's important to know that if you have multiple nested layers of Shadow DOM, you need to switch gradually, one after another, until you reach the layer of Shadow DOM where your element is located.
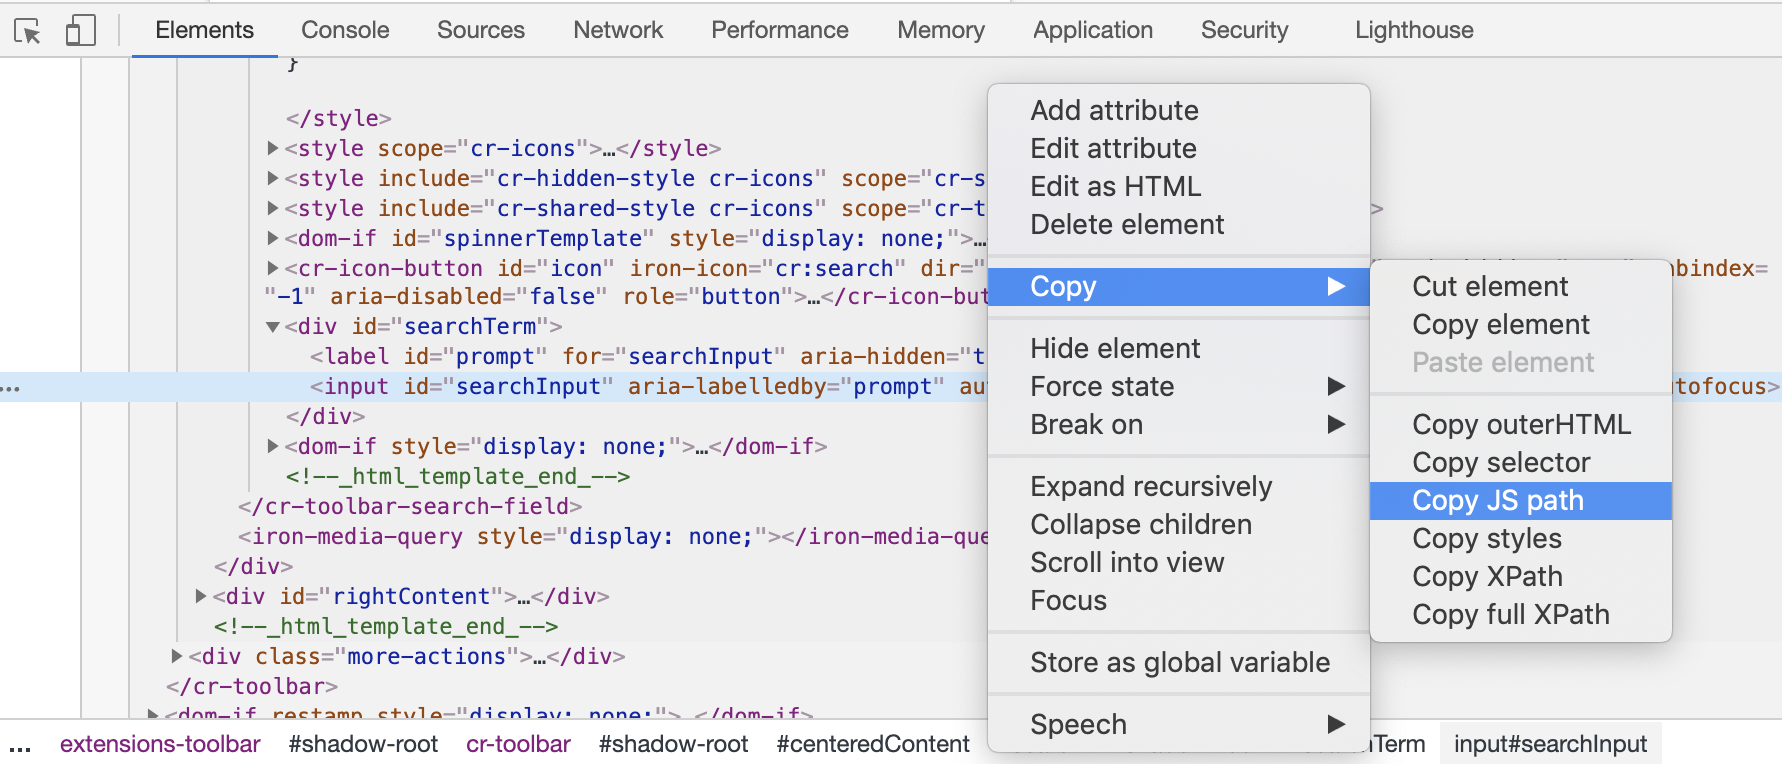
The locator for the Shadow DOM can be extracted from the element right above the shadow-root.
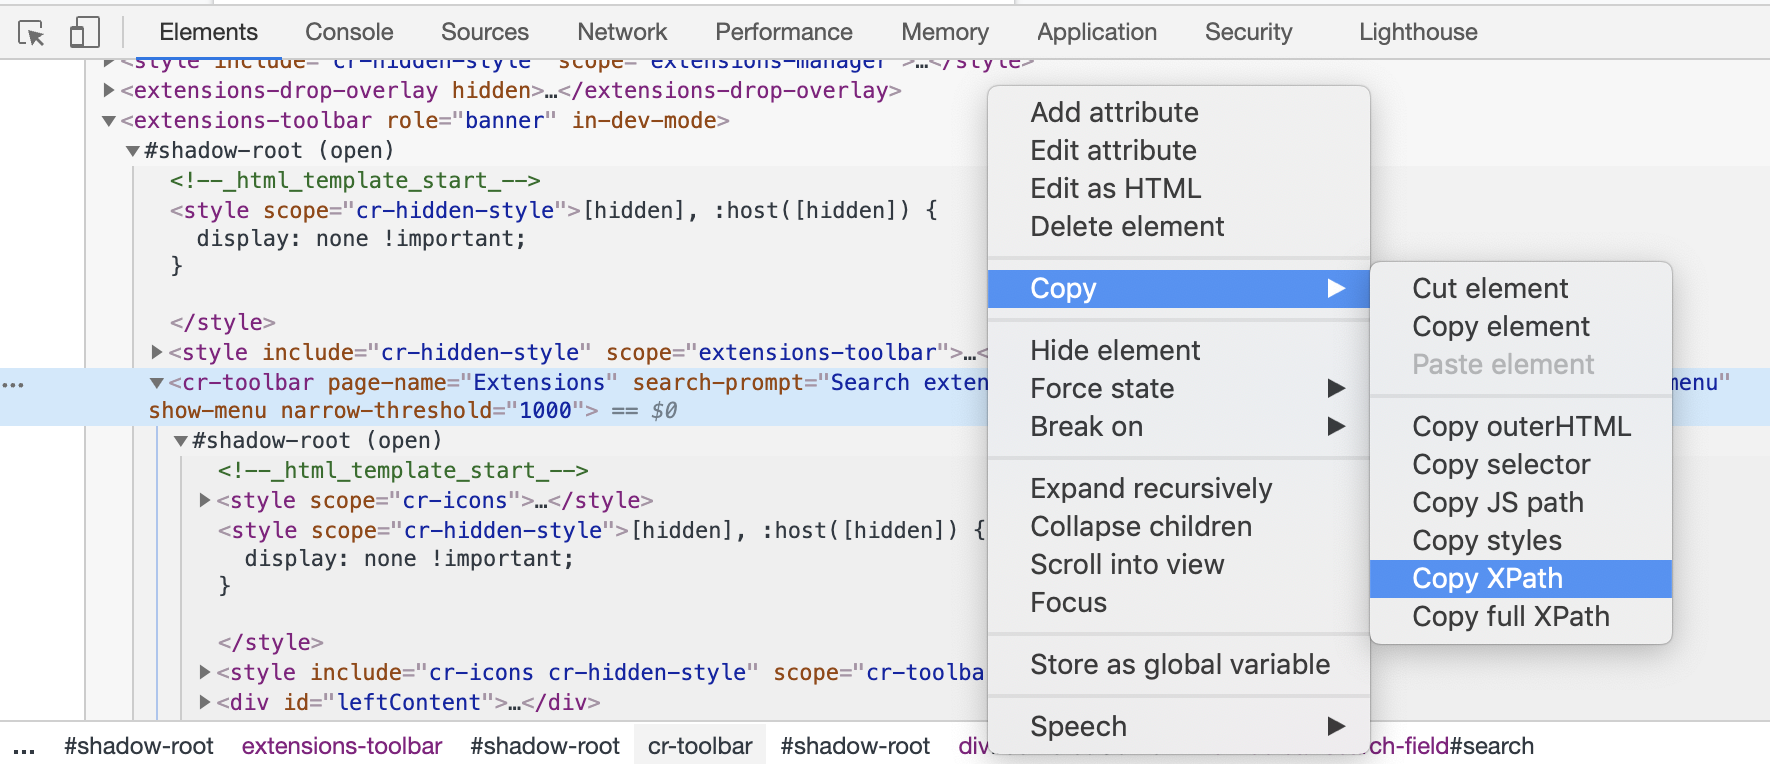
Or you can simply choose to perform the Click by using an Execute JavaScript step and using the JS path of that element, without using the Switch to Shadow DOM and Switch to Main DOM actions.
10. Write a custom XPath or CSS Selector.
Sometimes, the default XPath or CSS Selector provided by the browser might not be precise enough.
You can always write your own CSS Selectors and XPaths.
The element might have a certain attribute that has a certain unique value, you can write an XPath which locates the element by using that attribute, like this:
//*[@attribute = "attribute_value"]
You can also write an XPath which locates the element by using only part of the value of the attribute:
//*[contains(@attribute, "part_of_attribute_value")]
The equivalent CSS Selector can be written like this:
[attribute*="part_of_attribute_value"]
And you can also write an XPath which uses multiple attributes:
//*[@attribute_1 = "attribute_value_1" and @attribute_2 = "attribute_value_2"]
The same XPath can be written like this:
//*[@attribute_1 = "attribute_value_1"][@attribute_2 = "attribute_value_2"]
The equivalent CSS Selector can be written like this:
[attribute_1 = "attribute_value_1"][attribute_2 = "attribute_value_2"]
To narrow down the search, you can also mention the type of the element in the XPath:
//input[@attribute="attribute_value"]
For example, if you're targeting the input element with the type attribute that has the value file:
//input[@type="file"]
The same procedure can be applied to the CSS Selector:
input[attribute="attribute_value"]
And this is the equivalent CSS Selector for that element:
input[type="file"]
Here is a situation where we do not have any unique attributes:
<html>
   <body>
      <ul class="items">
         <li class="item">Apple</li>
         <li class="item">Orange</li>
         <li class="item">Banana</li>
      </ul>
   </body>
</html>
The solution is to write an XPath that uses the text from the element:
//li[text() = 'Orange']
If multiple elements have the exact same text, you can wrap the XPath in parentheses and provide the index to precisely target one of them:
The first element:
(//li[text() = 'Orange'])[1]
The second element:
(//li[text() = 'Orange'])[2]
The third element:
(//li[text() = 'Orange'])[3]
You can also write an XPath which only looks for a partial match of the text:
//li[contains(text(),'Orange')]
You should always verify the custom XPaths and CSS Selectors that you write.
This can be easily done in your own Chrome browser:
1. Open your Chrome browser.
2. Go to the page where your element is located.
3. Open the Chrome Developer Tools (Right Click -> Inspect).
4. Go to the Elements tab.
5. Press Ctrl + F or Command + F.
6. Paste your custom XPath or CSS Selector in the Find by string, selector, or XPath input.
7. If your custom XPath or CSS Selector is correct, your target element will be highlighted.
8. Make sure your custom XPath or CSS Selector doesn't point to more than one element.

11. Does the element need time to become interactable?
Our engine automatically waits for an element to be present before attempting to interact with it.
There are situations where an element might be present, but not interactable yet.
In this case, you can try adding a Pause step before the step that targets the element.